Yesterday the Daily Mail posted an article about how the nail art trend is growing due to the amount of celebrities sporting fancy designs on their nails. Celebrities like Madonna, Lady GaGa, Adele, and Katy Perry are inspiring woman from all over the world to decorate their nails in unique and fashionable ways. Nail art is also becoming big on the high fashion runways where many designers are pairing their designs with nail art to go along with it. They also say that the nail trends for Summer 2012 is pastel polishes with floral designs on them. If you would like more information from this article you can find it here:
http://www.dailymail.co.uk/femail/article-2137039/Fashion-fingertips-Follow-celeb-trend-making-nails-inventive-outfit.html?ito=feeds-newsxml
Monday, April 30, 2012
Sunday, April 29, 2012
Neon Water Marble!
I LOVE water marbles but they are probably the hardest thing that I have ever attempted to do nail art wise. They take a certain level of skill, and even after that they are still so temperamental that sometimes they don't even work out. I would by no means say that I am the master of marbles, but I have done a few cool ones in the past, and I think the one that I have for you guys today came out halfway decent. Below I will write out a step by step tutorial, but I don't have many pictures to go along with it because I was to concentrated on getting mine done right! haha also there are many amazing videos on YouTube from other bloggers that will give you a great visual on how to complete this process.
For this marble I used China Glaze Flip Flop Fantasy, China Glaze Celtic Sun, and Orly Blue Collar. I also used Wet n Wild French White Creme as a base for the marble to go on top of.

I started off with two coats of Wet n Wild French White Creme as a base for the marble. It's always good to use a base color when you do marbles so that the colors show up as much as they can. Even though you use a lot of polish in a marble it still only equates to one coat of polish when it is on your nails. The white helps bump up the opacity of the polish.


The next thing I do is tape up my fingers. When you stick your fingers in the water to get the design on you will end up with a lot of the excess polish all over the skin on your fingers. The tape helps with the clean up. The polish will end up on the tape and not on your skin. I put tape at the base of my nail and on the sides of my nail and also one piece on the top and it gives you pretty good protection from the polish in the water.
Now we get to the tricky part.
You will need a disposable cup or bowl of some sort, or a glass or bowl that you won't mind it it gets messed up. filtered room temperature water, and a toothpick.
1. Fill your bowl/ cup with room temperature filtered water.
2. Start to make your bulls eye. You do this by adding drops of polish to the water. For example for mine I did drops in the order of Yellow, Pink, Blue, and kept repeating that until there was no more room in the bulls eye. And remember to work quickly the polish will dry on the surface of the water and become hard to draw in if your don't.
3. After your bulls eye is made take your toothpick and draw your design in the water.
4. Once content with the design line your finger up over the part of the design that you would like to show on your nail.
5. Dunk your nail in the water keeping it level with the surface of the water. If you just point your finger into the water it will distort the design.
6. Use your toothpick to clean the excess nail polish off the surface of the water before you take your nail out.
7. Take nail out of water, remove tape, and enjoy.
8. Repeat these steps on the rest of your nails.
The end result will hopefully look something like this:


I am very happy with the way that mine came out. Luckily the polishes I chose spread out well together in the water and the design look good on my nails. It took me over 1 hours to finish the design on all my nails, but it think it was well worth it. I can't wait to try out some different marbles in the future!
Have your ever tried a water marble? Tell me about your experience by leaving a comment here, on Facebook, or tweet me @Polish_Paradise.
True Neon Nail Polish Illegal in the US
Yesterday creative director of CND Colours Jan Arnold told More magazine that it is illegal to produce neon nail polish in the U.S. This means that most of the nail polish that we call neon is actually just brightly colored. Any true neon colors that you find in U.S. stores are imported. Neon polish is always a big trend during the summer months and it is interesting to know that most of the polished that we call neon are not true neon polishes. If you would like more information about this you can check out the original article from More magazine:
http://www.more.com/runway-neon-nail-polish
http://www.more.com/runway-neon-nail-polish
Is Nail Polish the New Lipstick?
According to an article form the Inquirer Life Style while the sales of lipstick in the U.S. are dropping, the sales of nail polish are rising. In the past there has been a trend that when there is a recession the sales of lipstick rise. This rise in has recently been replaced with nail polish. Researchers believe that people experiment with nail polish in a recession because it is a inexpensive way to change your look and it can be easily changed if you do not like it. If you would like more information on this you can find it in the article below.
http://lifestyle.inquirer.net/45243/nail-polish-is-the-new-lipstick
http://lifestyle.inquirer.net/45243/nail-polish-is-the-new-lipstick
Saturday, April 28, 2012
Sally Beauty Haul and Swatches!
So today I went to Sally Beauty with some of my friends and I ended up buying 6 polishes. We had a pretty awesome coupon and all of the polishes at Sally's were buy 2 get 1 free, so it didn't do to much damage to my bank account! Two of the polishes that I bought are going to be for my 500 Facebook fan giveaway, and I want them to be a surprise so I did not include them in the haul pictures.

The four polishes that I bought for my self are China Glaze Peachy Keen, China Glaze Sea Spray, China Glaze Fast Track, and China Glaze Celtic Sun. Below are swatches of them all:


And last but not least China Glaze Celtic Sun which is a neon yellow color. It is pretty much the same color as a yellow highlighter. Neon's are always really hard to get good opacity on so what I usually do put a coat of white polish below them to help them look as bright as they should. In the pictures above the coat number on the pictures are for the nails that do not have white on them. The white pinkie nail has two coats over the white in the final picture and as you can see it looks much brighter than the nails that have three coats of polish on them. This is such an awesome neon color and I am currently using in a water marble!
What do you guys think of these colors? Do you have any guesses as to what my 500 fan giveaway polishes are? Leave a comment here, on Facebook, or tweet me @Polish_Paradise.

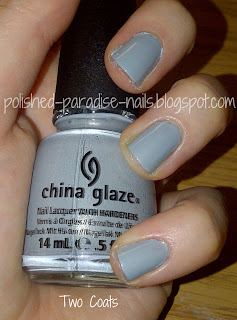
The four polishes that I bought for my self are China Glaze Peachy Keen, China Glaze Sea Spray, China Glaze Fast Track, and China Glaze Celtic Sun. Below are swatches of them all:


China Glaze Peachy Keen is an orange peach color creme polish. It has a great formula just like the rest of the China Glaze polishes and was very opaque after two coats. One thing I noticed different was that it looked more pink-orange on my nails, in this picture it looks sort of yellow-orange. Regardless it is a beautiful color and I can't wait to use it in some nail art.


China Glaze Sea Spray is a light gray blue color that I at first glance thought was a creme, but when I looked at it closely it has a slight satin finish, which is really nice. It was completely opaque after two coats and the formula was nice and smooth. The color reminds me of a misty beach sky. I have so many ideas of nail art designs to do with this. I cannot wait to try them out!


Next up is China Glaze Fast Track from the Hunger Games Collection. It is a light brown almost coffee with milk color with medium sized gold shimmers in it. It was another two coater! This polish is subtle but it catches the light nicely. It has a really nice shine to it and I was so happy that I was finally able to get my hands on it.


And last but not least China Glaze Celtic Sun which is a neon yellow color. It is pretty much the same color as a yellow highlighter. Neon's are always really hard to get good opacity on so what I usually do put a coat of white polish below them to help them look as bright as they should. In the pictures above the coat number on the pictures are for the nails that do not have white on them. The white pinkie nail has two coats over the white in the final picture and as you can see it looks much brighter than the nails that have three coats of polish on them. This is such an awesome neon color and I am currently using in a water marble!
What do you guys think of these colors? Do you have any guesses as to what my 500 fan giveaway polishes are? Leave a comment here, on Facebook, or tweet me @Polish_Paradise.
Thursday, April 26, 2012
Zoya Zuza and a Stamping Adventure
Today I finally got the chance to try the other Zoya polish I bought with my $10 off coupon, Zoya Zuza. I was so excited to finally try this beautiful color. It is an aqua blue foil metallic polish, and it is a great color for a summer manicure.

Above is Zuza after one coat. It is pretty opaque, but thin in some spots.

After two coats Zuza is completely opaque. It is such a beautiful color and it reminds me of a Caribbean sea.


Above is Zuza after one coat. It is pretty opaque, but thin in some spots.

After two coats Zuza is completely opaque. It is such a beautiful color and it reminds me of a Caribbean sea.


I wanted to add something more to the polish so I decided to use BM 210 stamping plate to stamp a design on to my nails. I used Wet n Wild French White Creme as the stamping polish. The design I chose came out great on some nails and not so great on others. To cover up some of the imperfections I decided to do a Glitter Gradient (see how to here) with Sally Hansen Xreme Wear in Disco Ball.

It's really hard to see the glitter in the picture, its very sheer and holographic so its hard to photograph, but it looks pretty cool when it catches the light. The blue and green flecks of glitter really pick up the beautiful color that Zuza has. I really like the combo of Zuza with Disco Ball over it and I think I could have gone with out the stamping on this one, but oh well you live and you learn.
What do you guys think of this mani? What other kinds of mani's would you like to see? Leave a comment here, on Facebook, or tweet me @Polish_Paradise. I want to hear want you guys want to see on this blog!
Tuesday, April 24, 2012
Silver and Gold, Silver and Gold... Oh and a little Blue too!
This week I have gotten a lot of awesome nail related goodies, so I decided to incorporate them into my manicure for today. I received two Zoya polishes that I ordered this week, Zuza and Trixie, and I also bought some Kiss Nail Art rhinestones, I guess you could call them that. They are more like metallic studs, but they look really cool.
For my manicure today I decided to use Zoya Trixie and China Glaze Blue Year's Eve, with some of the Kiss Nail Art rhinestones for an accent nails.

The picture above shows one coat of both Trixie (Sliver) and Blue Year's Eve (Blue). I am in love with Trixie, it is the PERFECT silver polish! It was very opaque after one coat, but I put a second one on to fill in any gaps. It is so reflective of the light, it almost looks like you have aluminum foil on your nails! Blue Year's Eve is a great color too. It is a little on the thin side and needed three coats to be opaque.

This picture shows Trixie at two coats and Blue Year's Eve at three.

I decided to put 3 of the square shaped gold rhinestones on each of my ring fingers in a straight line. These are really easy to use. You put a little pressure on them while they are on the sheet and then pull the one you want to use off. The pressure is to assure that the adhesive sticker on the back of them stays on them. They you place the rhinestone on your nail in the position you want it in and place a little more pressure on it. Then top it with a generous coat of top coat to seal the stones to the nail. I used Seshe Vite.


I love how this look came out! I have gotten so many complements on them, and they were really simple to do. I love the texture that it gives the nails. I cannot wait to try some of the other rhinestones that came in the package!
Have you ever used rhinestones in a mani? What do you think of them? Leave a comment here, on Facebook, or tweet me @Polish_Paradise!
Monday, April 23, 2012
Trend Alert: Nail Polish Jewelry
Over the past few weeks a new trend with nail polish has been popping up, and it is nail polish jewelry. This is where people use nail polish to paint clear glass stones with creative designs to create stones that can be used for jewelry. The great thing about this trend is that you can use your favorite color nail polishes and nail art trends to create unique custom jewelry for yourself. Also if you are into arts and crafts it could be a great way for you to make unique gifts for your friends. If you would like to see a tutorial on how to create your own you can check out the link below.
http://sweeterlemon.com/2011/11/14/nail-polish-jewelry-tutorial/
http://sweeterlemon.com/2011/11/14/nail-polish-jewelry-tutorial/
Saturday, April 21, 2012
Design of the Day: Galaxy Nails!
I was really bored and on back up duty last night so I decided to be bold and do some experimentation with the Galaxy nails that I have been seeing every where. I have always like the design, but I wanted to see if I could put my own twist on it. Also I have shorter nails than most of the people I have seen the designs on so I wanted to see how it would come out on a smaller canvas.
For this design I used China Glaze Smoke and Ashes, China Glaze Blue Year's Eve, Revlon Blue, Lagoon, Zoya Tru, China Glaze Solar Power, Wet n Wild French White Creme, and Revlon Stunning.
Below is a step by step tutorial on how to complete this look for yourself.

I started out with two coats of China Glaze Smoke and Ashes.

After that was dry I then used a cosmetic sponge with a little China Glaze Blue Year's Eve on it to dab a little blue sparkle on a diagonal across my nails.

Next put some Revlon Blue Lagoon on my cosmetic sponge and dabbed it over when I placed the darker blue before, leaving some of the darker blue showing.

After that I used Zoya Tru on the cosmetic sponge to add a little bit of purple above the light blue.

Next I put some China Glaze Solar Power on the cosmetic sponge and dabbed a little below the light blue color.

Next using a thin paint brush I added white dots to look like stars in the sky. The polish that I used for this is Wet n Wild French White Creme.

Over that I brushed a very thin coat of Revlon Stunning. It made it look like twinkling stars in the sky. Also if you get one or two of the large glitters on your nails it can look like large stars in the sky. Make sure to whip a lot of the glitter off the brush other wise you might end up with to much glitter on the nails and that will take away from the design.

Above is my finished manicure after I put some Seshe Vite top coat on it. I am really excited with how they came out. The great thing about this design is that it is very loose and it is almost impossible to make mistakes! All you really need for it is polish and a cosmetic sponge. It is really great to try out if you are new to nail art or if you have tried sponge gradients before. Also you can customize it to work with any color polishes that you have in your collection!
What do you guys think of Galaxy Nails? Leave a comment here or on Facebook, or tweet me @Polish_Paradise
Friday, April 20, 2012
Zoya's Earth Day Promotion

http://zoyanailpolish.blogspot.com/2012/04/its-back-earth-day-zoya-nail-polish.html
Thursday, April 19, 2012
Design of the Day: Triangle Tips
For my mani today I wanted to use the other two bottles that I bought at Ulta earlier this week. I decided that it would be fun to make triangles on the tips of my nails using scotch tape. The colors that I used for this manicure are OPI I Don't Give a Rotterdam! and Zoya Tru.

I started out by painting all my nails with two coats of I Don't Give a Rotterdam!

Next I cut small strips of scotch tape to help create the guides for the triangles. I use scotch tape a lot in my mani's and one thing that I find helps a lot is to stick the tape to the back of your hand before your stick it on to your nails. This takes some of the stickiness off the tape and helps to prevent the tape from pulling your first layer of dry polish up.

After you place your guide down you can then paint your polish of choice within the guidelines. For my mani I used Zoya Tru. Another tip for working with scotch tape is to gently pull the tape off after you paint your polish on. It is a lot easier to pull the tape off while the polish is wet and you will also end up with cleaner lines.


I am really excited with how this look came out in the end. I think that these two colors go very well together, they both have very similar shimmers to them and they both catch the light nicely. I think the triangles came out great too. I really wanted to do double triangles but I could not find a third polish in my collection that went with the two. Oh well maybe next time!
Have you ever tried a scotch tape mani? Let me know by leaving a comment here, on Facebook, or tweet me at @Polish_Paradise!
Sunday, April 15, 2012
Butter London Trout Pout with Stamping!
As I posted earlier I purchased Butter London Trout Pout at Ulta today and I had to try it out immediately! It is such a beautiful bright salmon pink color that is perfect for the spring season! I did take 3 coats to get it completely opaque. The first 2 coats were very streaky but the 3rd one evened them out. I really love this color and I am so glad that I was finally able to find it!


The picture above shows the polish at 3 coats. After that I decided it would be cool to top it off with a stamp. I wanted to give it a little more flash. I used BM 206 for the design and Wet n' Wild Wild Shine in Black Creme for the stamping polish.

I really like how the design came out. I am still working on my stamping skills, but I am getting better with every time time that I do them. If you want more information on stamping plates or how to use them you can check out my blog post on them here.
I would love to know what you guys think of this design. Leave a comment here, on Facebook, or tweet at me on twitter @Polish_Paradise!
Mini Ulta Haul!
This weekend was the grand opening of the new Ulta by my school. To get students to visit the store they put $5 off of $10 coupons in the school newspaper which was definitely enough to get me into the store! I went today with a couple of my friends and I was able to pick up some polishes that I had really wanted!

I bought Butter London Trout Pout, Zoya Tru, and OPI I Don't Give a Rotterdam! I was so excited to finally find Trout Pout all the Ulta's near where I live have been out of them for a while. Tru just caught my eye today, it is a deep purple with golden shimmers. I Don't Give a Rotterdam! is from the OPI Holland Collection. I have had my eye on it for a while. It is a light gray-blue with a golden shimmer.


Tru is shown above with two coats. It is such a deep beautiful color! I cannot wait to use it for a full mani!
As for Trout Pout I am currently using it for my mani and I will have pics up of it later!
What do you guys think of these colors? Are there any colors you have an eye out for? Leave a comment here or on Facebook or tweet me @Polish_Paradise!

I bought Butter London Trout Pout, Zoya Tru, and OPI I Don't Give a Rotterdam! I was so excited to finally find Trout Pout all the Ulta's near where I live have been out of them for a while. Tru just caught my eye today, it is a deep purple with golden shimmers. I Don't Give a Rotterdam! is from the OPI Holland Collection. I have had my eye on it for a while. It is a light gray-blue with a golden shimmer.

This is I Don't Give a Rotterdam! is shown above with two coats. It was very opaque ans very beautiful.

Tru is shown above with two coats. It is such a deep beautiful color! I cannot wait to use it for a full mani!
As for Trout Pout I am currently using it for my mani and I will have pics up of it later!
What do you guys think of these colors? Are there any colors you have an eye out for? Leave a comment here or on Facebook or tweet me @Polish_Paradise!
Nail Polish is Not Always What It Seems
Last week a news story from the NBC station in San Diego broke about how many brands commonly used in salons in California were found to have high levels of many of the toxic chemicals that can be harmful to women. The 25 brands that the Department of Toxic Substance Control picked at random all claimed to be free of harmful chemicals. After testing it was determined that they all contained high levels of toluene, dibutyl phthalate (DPB) and/or formaldehyde. While the Department of Toxic Substance Control said they could not estimate how many people were exposed to the chemicals; it is still alarming that many of these brands claimed to be "Three Free" when they were not.
If you would like to check out the full article you can see it here:
http://www.nbcsandiego.com/news/local/Nail-Polish-Labels-Toxic--146811035.html
If you would like to check out the full article you can see it here:
http://www.nbcsandiego.com/news/local/Nail-Polish-Labels-Toxic--146811035.html
Thursday, April 12, 2012
My First Zoya's and an Awesome Design!
I just received the two Zoya polishes that I ordered using the Share the Love Program. (More info about the Share the Love Program here!) I decided to buy Zoya Arizona which is a orange-yellow creme color and Zoya Kimber is a bright pink foil metallic that has a hint of golden-orange shimmer. Both of these colors are from the Zoya Summer 2012 Beach and Surf Collection.

I had to try them both out immediately, which meant using them both in a design together! It wasn't to hard since the colors go beautifully together! I decided it would be really fun and summery to do polka dots!

I had to try them both out immediately, which meant using them both in a design together! It wasn't to hard since the colors go beautifully together! I decided it would be really fun and summery to do polka dots!
 |
| One Coat |
On a side note about the actual polish, Kimber is a beautiful color was was very opaque after one coat, but after two coats the color becomes much richer hand has more depth. Arizona was a little streaky after one coat but after two coats it filled in and is a beautiful bright cheery color!
I first started by painting my nails with the color that I wanted to be the background of the dots. I used Arizona on all my fingers except my ring finger, where I used Kimber just to change things up a bit. After the polish had dried I used a toothpick to place the dots on each nail. Kimber's formula was very easy to dot with, all the dots came out smooth and round. Arizona was a little harder to work with for the dots, the dots did not want to spread out as much and it was harder to get them into a perfect round shape.
Surprisingly my right hand which I painted with my left hand (I'm a righty) came out much better than my left hand! This usually never happens for me! I really love how these two colors go together, and I have gotten so many complements on the color combination all day long! I am so impressed with these Zoya colors and I cannot wait to buy some more of them!
What do you think of Zoya Polishes? Can you recommend any good colors of there's? Leave a comment here or on Facebook, or you can Tweet at me on Twitter @Polish_Paradise
 |
| Two Coats |
I first started by painting my nails with the color that I wanted to be the background of the dots. I used Arizona on all my fingers except my ring finger, where I used Kimber just to change things up a bit. After the polish had dried I used a toothpick to place the dots on each nail. Kimber's formula was very easy to dot with, all the dots came out smooth and round. Arizona was a little harder to work with for the dots, the dots did not want to spread out as much and it was harder to get them into a perfect round shape.
 |
| Left Hand |
 |
| Right Hand |
What do you think of Zoya Polishes? Can you recommend any good colors of there's? Leave a comment here or on Facebook, or you can Tweet at me on Twitter @Polish_Paradise
Follow Polished Paradise on Twiiter!

I finally made a twitter for the blog! Make sure to check it out and follow me @Polish_Paradise ! I am so excited to start interacting with you all on Twitter! Tweet at me! I would love to know what you all think of the blog!
Subscribe to:
Posts (Atom)