Showing posts with label Tutorial. Show all posts

Monday, August 20, 2012

Tutorial: Roses

I have been in a real nail art mood lately, so I decided it would be fun to try out a design that I have had brewing in my head for a while... a play on a floral denim pattern.  I really love using flowers for nail art.  They are so feminine and dainty

For this design I used OPI I Don't Give a Rotterdamn!, Color Club Poker Face, Ulta Noel, China Glaze Holly-Day, and Kiss Nail Art Paint in White.  I also used a large pointed and small pointed dotting tool to create the roses.

I did the tutorial on a nail wheel so that it would be easier for me to photograph step by step.  

Step 1:

I started out with two coats of OPI I Don't Give a Rotterdamn!

Step 2:


Using the small dotting tool and Kiss Nail Art Paint in White I created a polka dot background.

Step 3:


Using the large dotting tool and Color Club Poker Face I painted 3 large red dots on the nail.

Step 4:


After wiping the large dotting tool clean; I then used it and Ulta Noel to add 3 large light pink dots to the nail.

Step 5:


Using the small dotting tool swirl all the pink and red dots together.  Try and swirl the colors inwards so that it looks like a rose bud when you are finished.  Make sure that you do this quickly after you make the dots.  You will not be able to swirl the dots if they have already dried.

Step 6:


Using the small dotting tools and China Glaze Holly-Day I added two smalls leaves, one on each side of the rose.

Step 7:


Finally I added one coat of Hong Kong Girl top coat which smoothed things and made the flower blend together nicely.


I really love how this came out!  It is just how I imagined it!  Also I can't believe how simple it was to create.  I think this is one of my all time favorite manicures that I have ever done on myself!  I also really love how the color I chose for the background looks very similar to the color of denim to give it that similar look.

Have you ever done a flower manicure?  Leave a comment here, on Facebook, or tweet me @Polish_Paradise!


Wednesday, June 20, 2012

Tutorial: Reverse Gold Glitter Gradient

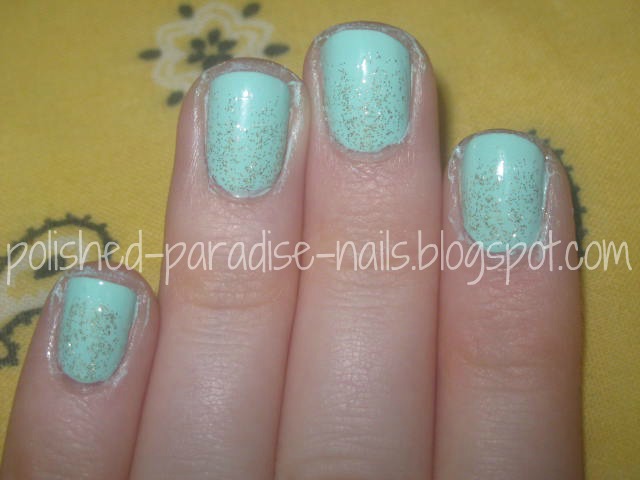
From the first time I saw Julep Oscar I knew it would be the perfect gold glitter for a glitter gradient! So that is what I have for you all today.  I created what I call a reverse glitter gradient with Julep Oscar, Essie Cosmo's PSS Shimmer, and Saint Germain Sea Green. I have included a tutorial for the glitter gradients again because I get a lot of requests on how to recreate my other glitter gradients and they are so easy and beautiful.

Step One:

Paint your nails with you base color of choice.  I used three coats of Saint Germain Sea Green.

Step Two:


I used one very thin coat of Essie Cosmo's PSS Shimmer do add some different sized glitters to the gradient.  I started painting it at the base of my nail and went 3/4 of the way to the top and left a space of just the base polish.  I also tried to stagger how high the glitter went up.  You don't want it to just look like it stopped at a specific line, you want it to look like it just happened.

Step Three:


Next I added a thin coat of Julep Oscar on top of that, bringing it to around the same area on the nail and staggering where the glitter stops.

Step Four:


I then added more Oscar, but this time adding a thicker coat stopping half way up the nail.

Step Five:


Next I repeated step four but only adding Oscar to the bottom 1/4 of my nail.  This makes the glitter dense at the base of the nail, and leaves the tips of the nails looking like the glitter is floating off of it.

Indoors
Sunlight
Sunlight
I think the combination of Saint Germain Sea Green and Julep Oscar look stunning together.  Also the addition of Essie Cosmo's PSS Shimmer adds some different color and textured glitters to the look.  I looks so sparkly and sophisticated! This is a beautiful fresh look for summer and it is so easy to replicate for yourself.

Have you tried glitter gradients?  Leave a comment here, on Facebook, or tweet me @Polish_Paradise!

Don't forget to enter my 100 Blog Follower Giveaway!


Tuesday, June 5, 2012

Tutorial: Zoya Blogger Trio Dotticure!

I really wanted to put all of the awesome nail products I have received recently to work, so I decided to see how many of them I could use in one manicure while having it still look cool.


The pictures above are what I ended up with.  For this design I used Zoya Kate, Zoya Coraline, and Wet'n'Wild French White Creme to create the dots.


To create the dot look that is on a majority of the nails I started off with two coats of Zoya Kate on each of the nails I wanted to have dots.  After the two coats were dry I use my medium sized dotting tool (you could use a toothpick if you do not have dotting tools) dipped in Wet'n'Wild French White Creme to create the polka dot pattern on each nail, making sure to evenly space the dots out.  After all the dots were dry I went over them with another coat of Kate so that they would have light pink color and would look like they were sandwiched in the layers of the jelly polish.  Then I topped it off with a coat of Seche Vite top coat.


For my accent nail I started off with three coats of Zoya Coraline.  After that was dry I put two stripes of green striping tape criss crossing each other on the nail.  Be very careful when trying to cut the tape flush to the nail.  They ideal tool to have to cut the tape would be a cuticle nipper, but I unfortunately do not have one of those so I used a scissors which did not cut the tape close enough to the edge as I would have liked it.  They I topped the tape off with one of the flowers from the nail art rods set.  I used an exacto knife to cut a very thin slice off of the rod and then adhered it to my nail with a generous dob of top coat.  Once again if you do use an exacto knife for cutting anything please be very careful because they are very sharp.  I then covered the nail with a generous coat of top coat to make sure that the flower was completely adhered to the nail.

I really love how this design came out! It incorporated all of the things I wanted it to with out it looking to crazy!  I think its a cute summer look! But I have to say that my favorite nails are the polka dot nails.  I am in love with Zoya Kate and I love how the dots look with the polish.

What are your favorite summer nail looks?  Leave a comment here, on Facebook, or tweet me @Polish_Paradise!

Thursday, April 19, 2012

Design of the Day: Triangle Tips

For my mani today I wanted to use the other two bottles that I bought at Ulta earlier this week.  I decided that it would be fun to make triangles on the tips of my nails using scotch tape.  The colors that I used for this manicure are OPI I Don't Give a Rotterdam! and Zoya Tru.


I started out by painting all my nails with two coats of I Don't Give a Rotterdam!


Next I cut small strips of scotch tape to help create the guides for the triangles.  I use scotch tape a lot in my mani's and one thing that I find helps a lot is to stick the tape to the back of your hand before your stick it on to your nails.  This takes some of the stickiness off the tape and helps to prevent the tape from pulling your first layer of dry polish up.


After you place your guide down you can then paint your polish of choice within the guidelines.  For my mani I used Zoya Tru.  Another tip for working with scotch tape is to gently pull the tape off after you paint your polish on.  It is a lot easier to pull the tape off while the polish is wet and you will also end up with cleaner lines.


I am really excited with how this look came out in the end. I think that these two colors go very well together,  they both have very similar shimmers to them and they both catch the light nicely.  I think the triangles came out great too.  I really wanted to do double triangles but I could not find a third polish in my collection that went with the two.  Oh well maybe next time!

Have you ever tried a scotch tape mani? Let me know by leaving a comment here, on Facebook, or tweet me at @Polish_Paradise!