Showing posts with label China Glaze. Show all posts

Monday, August 20, 2012

Tutorial: Roses

I have been in a real nail art mood lately, so I decided it would be fun to try out a design that I have had brewing in my head for a while... a play on a floral denim pattern.  I really love using flowers for nail art.  They are so feminine and dainty

For this design I used OPI I Don't Give a Rotterdamn!, Color Club Poker Face, Ulta Noel, China Glaze Holly-Day, and Kiss Nail Art Paint in White.  I also used a large pointed and small pointed dotting tool to create the roses.

I did the tutorial on a nail wheel so that it would be easier for me to photograph step by step.  

Step 1:

I started out with two coats of OPI I Don't Give a Rotterdamn!

Step 2:


Using the small dotting tool and Kiss Nail Art Paint in White I created a polka dot background.

Step 3:


Using the large dotting tool and Color Club Poker Face I painted 3 large red dots on the nail.

Step 4:


After wiping the large dotting tool clean; I then used it and Ulta Noel to add 3 large light pink dots to the nail.

Step 5:


Using the small dotting tool swirl all the pink and red dots together.  Try and swirl the colors inwards so that it looks like a rose bud when you are finished.  Make sure that you do this quickly after you make the dots.  You will not be able to swirl the dots if they have already dried.

Step 6:


Using the small dotting tools and China Glaze Holly-Day I added two smalls leaves, one on each side of the rose.

Step 7:


Finally I added one coat of Hong Kong Girl top coat which smoothed things and made the flower blend together nicely.


I really love how this came out!  It is just how I imagined it!  Also I can't believe how simple it was to create.  I think this is one of my all time favorite manicures that I have ever done on myself!  I also really love how the color I chose for the background looks very similar to the color of denim to give it that similar look.

Have you ever done a flower manicure?  Leave a comment here, on Facebook, or tweet me @Polish_Paradise!


Thursday, August 2, 2012

Olympic Fever!

I don't know about you guys, but I have been totally obsessed with the Summer Olympics the past few days.  I love watching swimming and  gymnastics and I have been so happy to see so many talented American athletes take home metals.  It is so excited to watch someones dreams come true right before your eyes! Seeing the America girls gymnastics team take home gold the other night inspired my manicure today.

For this manicure I decided to focus on themes of the Olympics not just the USA.  I painted my pointer, middle and ring finger on each hand with gold, silver and bronze to represent the Olympic metals and on my thumb and pinky I painted the 5 Olympic rings using large and small dotting tools on a white base.


For the gold, silver and bronze fingers I used Julep Oscar, Zoya Trixie, and OPI Take The Stage; and for the rings I used Wet n' Wild French White Creme, Essence Walking on Air, Wet n' Wild Black Creme, China Glaze Poinsettia, China Glaze Solar Power, China Glaze Holly-Day.


To create the ring design I used the large side of a dotting tool to make 5 dots, one of each color featured in the ring design then I used the smallest size dotting tool that I had to add white dots inside the color dots to create the illusion that they are rings.

I am really excited with how this design came out and I have been getting complements on it all week! I also love how simple it was to get the olympic ring look.  Also on a side note this is probably the most bottles of nail polish I have used in one manicure!

What are you wearing for your Olympic mani?  Leave a comment here, on Facebook, or tweet me @Polish_Paradise!


Tuesday, July 24, 2012

Try it on Tuesday! Nails Inc. Electric Lane


For today's "Try it on Tuesday" I decided to try out Nails Inc. Electric Lane Special Effects Holographic Glitter Top Coat that I bought a couple of weeks ago but never tried out.  I put it on over China Glaze Flip Flop Fantasy creating a scotch tape manicure.


To create this look I took a square piece of scotch tape and made a triangle at the bottom of then nail, similar to a half moon design but with a point at the top.  Make sure to stick the tape to the back of your nails a couple of times and also make sure that your base color is completely dry before you put the tape down so that it doesn't smudge your polish.

I really like the Nails Inc. polish! It has a great formula and a lot of glitter in it and it looks so great over the neon pink!  It is so bright and sparkly I cannot stop looking at it while I am typing this post up right now!  For me this is an awesome bright summer nail design!

Do you own any Nails Inc. polishes?  What do you think of them?  Leave a comment here, on Facebook, or tweet me @Polish_Paradise!


Wednesday, July 18, 2012

500 Fan Giveaway!

I am so excited to present to you the Polished Paradise 500 fan giveaway!  If it was not for all of my amazing fans who follow this blog, Facebook page, Twitter, and Pinterest, I would never have come this far with this blog.  All of the people who read this blog inspire me to keep going with new material and also to find ways to get everyone involved!  For all of that I  thank you all with this giveaway!

Now for the exciting stuff! The giveaway details!


This giveaway consist of 3 great prizes.  There will be 3 winners and each winner will win one of the prizes.


The first prize is two bottles of China Glaze polish from the Prismatics collection.  The colors are Liquid Crystal and Full Spectrum!


Prize number 2 is a Zoya mini trio with mini bottles of Zuza, Kimber, and Myrta.


Prize number 3 is a mini set of Sally Hansen Xtreme wear polishes. There are 4 in the set, and they would be great for skittle nails!

- Must be 18 years old to enter.
- It is open to people living in the US and Canada (sorry to my international fans! The rules for mailing polish out of the country and overseas are crazy. But still enter if you have a US address you can have it sent to!)
- Please be honest with the things you enter below.  I will be verifying the winners entry and people who make up fake entries will not win.  Honesty is the best policy!
- The winner of the giveaway will be contacted by email and must reply within 48 hours from the time the email was sent or a new winner will be drawn.
- The Giveaway will end at 12:01a.m. on August 1st. a Rafflecopter giveaway


Tuesday, July 17, 2012

Fan Chosen Tutorial: Sponge Gradient!

Hello everyone! I know it has been a little while since my last post, things have been really crazy with work and life, and it has been really hot here in New York which makes me feel too hot and lethargic to polish my nails.  But that is all about to change, I have some really cool post coming up for you guys and one of the new series I am going to be doing is a Fan Chosen Tutorial Series.  Every week I will post a survey question on the Polished Paradise Facebook Page and the fans on my page will vote to choose what tutorial they would like to see this week.  This weeks tutorial is a sponge gradient that won with 14 votes!

For this tutorial I decided to use polishes in the blue family; China Glaze For Audrey, Zoya Charla, and China Glaze Blue Year's Eve.  It is such a simple nail art design that is sure to jazz up your manicure for the summer!

Step One:
I like to start out with a base coat of the lightest color polish that I am using. In this case I put down two coats of For Audrey.


Step Two:
I use a cosmetic sponge and paint three lines of the colors that I am using for the gradient.  I prefer this methods to others because I find it to be the easiest, and also it wastes less polish and cosmetic sponges than the other methods.


Step Three:
Then I press the sponge over the nail making sure to get good coverage of polish.  I also tend to dab the sponge a little more at the top of the nail to make sure that the darkest top color gets dark enough coverage.


Step Four:
Repeat steps one through three on all of your nails and then cover them with a top coat.  The top coat smooths out the polish and helps the colors all blend together.  Then enjoy your nails!


Gradients happen to be one of my favorite designs.  I think that they are so versatile and you can do so many things with them.  If you want to add more to the look you can add stamping or dots to it which can give another cool spin on this look.

Have you ever done a gradient on your nails?  Do you have any good tips?  Leave a comment here, on Facebook, or tweet me @Polish_Paradise!


Tuesday, July 3, 2012

Happy 4th of July!

Hello everyone! Happy 4th of July!  I hope that you all have a wonderful day celebrating tomorrow!  I personally will be working for part of the day but after that I will be relaxing with my family.  Today I have some 4th of July nail art for you!  I used Zoya Charla and China Glaze Ruby Pumps as my polish colors for this manicure, and to create the rest of the design I used Kiss nail art decal stars and white striping tape.


I painted Charla on my thumb and pointer fingers to create the blue background for the stars on the flag.  Then I painted Ruby Pumps on my last three fingers and added white striping tape to make it look like the American flag.  It was definitely an experience working with the striping tape so much in one manicure, but towards the end I got a much better hand on how to use it successfully.  I also made sure to put many layers of top coat to help prevent the stars from falling off, and also to prevent the striping tape from curling and pealing.  So far they are holding up well, but we will see what tomorrow brings!

What did you wear for your 4th of July manicure? Leave a comment here, on Facebook, or tweet me @Polish_Paradise!


Wednesday, June 13, 2012

Design: Morning Coffee!

Lately I have really been wanting to try out Newspaper print nails again, but I really wanted to add something to them to give them my own unique spin.  I decided that it would be really cool to see if I could make it look like there was coffee mug rings on the newspaper.  For this design I used NYC French White Tip and China Glaze Ingrid.

How to:

For the Newspaper Nails:
1.  Paint your nails with your base color. For me I used 3 coats of NYC French White Tip.
2.  Wait for the polish to dry completely.
3.  Take strips of news paper and dip them in rubbing alcohol and apply to the nail.  Hold a cotton ball dipped in rubbing alcohol over the paper strip on the nail.
4.  Hold for 30-45 seconds on the nail.
5.  Gently remove the paper strip and the cotton ball.
6.  View your cool design!
7.  Repeat on each nail.

For the Coffee Stains:
1.  Dip the large end of a dotting tool in brown polish.  I used China Glaze Ingrid.
2.  Create a large dot on the nail.
3.  Use the smaller dotting tool to scrape some of the brown polish out of the center of the dot so that it looks more like a ring.
4.  Add little dribble dots with the smaller dotting tool to look like drops of spilt coffee around the ring.
5.  Cover with top coat.


I am really excited with how this came out!  It looks exactly like I had imagined it in my head!  I think that this is a cute little spin on an already awesome design.

Have you tried newspaper nails?  What do you think of them?  Leave a comment here, on Facebook, or tweet me @Polish_Paradise!


Friday, June 8, 2012

Design: Spots on the Sun

Recently I have really been feeling the color orange.  It is such a beautiful bright summery color and I wanted to pay homage to it in my design today.  How I came up with this design, I don't even know.  One thing led to another and poof! I had my end result, which I have to say I am really excited with.  For this design I used Zoya Arizona, China Glaze Poinsettia, China Glaze Riveting, and Wet n' Wild Black Creme. Check out the steps below to recreate this look for yourself!


I started out by painting my nails with two coats of Zoya Arizona as a base for my gradient.


Next I used a cosmetic sponge to create my gradient.  I decided to try a different technique for creating a gradient that I had seen online.  For this I painted stripes of each color on my gradient on the sponge all at once and then pressed the sponge over my nail.  It created an even gradient with half the effort of sponging each color on one at a time.  I put Poinsettia as the top stripe, Riveting as the middle stripe, and Arizona as the bottom stripe.


These colors all went so well with each other, and it was really nice that Riveting brought a little bit of shimmer to the other two creme polishes.  I really liked how these colors came together... but it wasn't enough for me, I wanted to add something else to my nails.  What should I add is all I kept thinking.  Then it finally came to me, keep it simple and add some black dots.  And that is what I did.


I used Wet n' Wild Black Creme and a dotting tool to add two different sized dots in a random pattern around half of my nail.  The colors of the orange polishes together remind me of the surface of the sun and the black dots are kind of like sun spots.  I am really digging this design and I think I am going to wear it thought out the weekend!

How do you create gradients?  Leave a comment here, on Facebook, or tweet me@Polish_Paradise!


Thursday, May 31, 2012

Blue Drag Marble Design

For my nails today I wanted to try something a little different and fun, so I did take on a drag marble.  I started with a base of Deborah Lippmann Let's Hear it for the Boy while it was still wet on my nail I used and orange stick or you could use a toothpick or dotting tool to drag lines of  color across my nails.  The colors I chose to drag were Zoya Trixie, China Glaze Blue Year's Eve, and Orly Blue Collar.  It is so simple to recreate this look.  One finger at a time paint a think coat of your base color (in my case Let's Hear it for the Boy) then dip what ever tool you choose to use in a polish and drag lines across your nail.  Repeat that with all the colors you want to put into your design.  Then repeat the steps on each nail.

Left Hand:

 Right Hand:

I like how this design came out.  It reminds me of a watercolor painting or something like that.  The design is simple but it is still eye catching and very stunning.

What do you think of this design?  Leave a comment here, on Facebook, or tweet me @Polish_Paradise!


Monday, May 28, 2012

It's the Bee's Knees!


Hey guys! I hope you all had a wonderful holiday weekend!  I officially started my new job this weekend working for a local radio station and I  got to work at a huge air show event at one of the local beaches, which was a lot of fun!  The station I work for has a mascot of a bee so in honor of my first day working for them I did a simple bee design on my nails!  I used China Glaze Solar Power and Kiss Nail Art Paint in Black.  The design is simple.  I started with two coats of Solar Power and then I put 4 thin black lines on each nail with the black nail art paint.   The design looked really good until I tried to put top coat over it, the black paint smudged.  This is a problem that I have had with the nail art paint in the past and that's usually why I do not use it.  It's seems like no matter how long you wait the black paint never dries and smudges your design when you go to cover it with top coat.  Oh well, not my best, but it was a fun quick manicure.

What kind of nails did you have for the holiday weekend? Leave a comment here, or share some pictures with me on Facebook, and on twitter @Polish_Paradise!


Wednesday, May 16, 2012

Orange You Glad I Didn't Say Bannana?!


Today I decided to keep it simple with my manicure.  I used China Glaze Peachy Keen with a thin coat of Revlon Stunning.  I think these two polishes go really well together.  Peachy Keen is a beautiful pink-orange color that is perfect for spring and Stunning holographic glitters look really nice when the light catches them on a beautiful spring day!

What do you have on your nails today?  Leave a comment here, on Facebook, or tweet me @Polish_Paradise!


Monday, May 7, 2012

Spring Fling Color Block Nails

I was really feeling the spring fever this weekend!  My university held there annual Spring Fling carnival/ concert event on Saturday and I wanted my nails to match the mood of the weekend, so I went with a spring themed color block manicure.  For this design I used China Glaze Lemon Fizz, China Glaze For Audrey, and China Glaze Peachy Keen.

I started by painting all my nails with two coats of Lemon Fizz.  After that was dry I used scotch tape to mark off where I wanted the color blocks to be on each nail.  Then I filled it in with the other two colors of polish that I had.


This design was defiantly an experiment, but I really like how the design came out.  A lot of people complemented me on them over the weekend, which is always nice. I also really enjoy how the colors of the polish went well together.  I feel like they would make for good water marble colors.

What do you think of color block nails?  Leave a comment here, on Facebook, or tweet me@Polish_Paradise.


Tuesday, May 1, 2012

Blowing in the Wind

For my nail design today I was inspired by a design that I saw on Pinterest.  It looked like a dandelion on one finger and it was blowing off into the wind on the other fingers.  I thought it was a cute dainty design that would be perfect for spring and one of the new nail polish that I bought last week.  For this design I used China Glaze Sea Spray (which might possibly be my new favorite polish), Sally Hansen Nail Art Pen in Black, and white polish.


I started off with two coats of Sea Spray for the background color.


I then used the nail art pen to draw the stem of the flower on my pointer finger.  Then I used white polish on a thin paint brush to paint the white fluffs blowing away.  I basically just painted different sized white lines on all my fingers to look like they were blowing away.  While I don't think my interpretation of the design is a good as the original, I am still very please with the way that it came out.  I also just really love the color of Sea Spray, it is so beautiful!

What kinds of designs would you like to see more of?  Leave a comment here, on Facebook, or tweet me @Polish_Paradise.


Sunday, April 29, 2012

Neon Water Marble!

I LOVE water marbles but they are probably the hardest thing that I have ever attempted to do nail art wise.  They take a certain level of skill, and even after that they are still so temperamental that sometimes they don't even work out.  I would by no means say that I am the master of marbles, but I have done a few cool ones in the past, and I think the one that I have for you guys today came out halfway decent.  Below I will write out a step by step tutorial, but I don't have many pictures to go along with it because I was to concentrated on getting mine done right! haha also there are many amazing videos on YouTube from other bloggers that will give you a great visual on how to complete this process.

For this marble I used China Glaze Flip Flop Fantasy, China Glaze Celtic Sun, and Orly Blue Collar.  I also used Wet n Wild French White Creme as a base for the marble to go on top of.


I started off with two coats of Wet n Wild French White Creme as a base for the marble.  It's always good to use a base color when you do marbles so that the colors show up as much as they can.  Even though you use a lot of polish in a marble it still only equates to one coat of polish when it is on your nails.  The white helps bump up the opacity of the polish.


The next thing I do is tape up my fingers.  When you stick your fingers in the water to get the design on you will end up with a lot of the excess polish all over the skin on your fingers.  The tape helps with the clean up.  The polish will end up on the tape and not on your skin.  I put tape at the base of my nail and on the sides of my nail and also one piece on the top and it gives you pretty  good protection from the polish in the water.

Now we get to the tricky part.

You will need a disposable cup or bowl of some sort, or a glass or bowl that you won't mind it it gets messed up. filtered room temperature water, and a toothpick.

1.  Fill your bowl/ cup with room temperature filtered water.
2. Start to make your bulls eye.  You do this by adding drops of polish to the water.  For example for mine I did drops in the order of Yellow, Pink, Blue, and kept repeating that until there was no more room in the bulls eye. And remember to work quickly the polish will dry on the surface of the water and become hard to draw in if your don't.
3. After your bulls eye is made take your toothpick and draw your design in the water.
4. Once content with the design line your finger up over the part of the design that you would like to show on your nail.
5. Dunk your nail in the water keeping it level with the surface of the water.  If you just point your finger into the water it will distort the design.
6. Use your toothpick to clean the excess nail polish off the surface of the water before you take your nail out.
7. Take nail out of water, remove tape, and enjoy.
8. Repeat these steps on the rest of your nails.

The end result will hopefully look something like this:


I am very happy with the way that mine came out.  Luckily the polishes I chose spread out well together in the water and the design look good on my nails.  It took me over 1 hours to finish the design on all my nails, but it think it was well worth it.  I can't wait to try out some different marbles in the future!

Have your ever tried a water marble? Tell me about your experience by leaving a comment here, on Facebook, or tweet me @Polish_Paradise.


Saturday, April 28, 2012

Sally Beauty Haul and Swatches!

So today I went to Sally Beauty with some of my friends and I ended up buying 6 polishes.  We had a pretty awesome coupon and all of the polishes at Sally's were buy 2 get 1 free, so it didn't do to much damage to my bank account! Two of the polishes that I bought are going to be for my 500 Facebook fan giveaway, and I want them to be a surprise so I did not include them in the haul pictures.


The four polishes that I bought for my self are China Glaze Peachy Keen, China Glaze Sea Spray, China Glaze Fast Track, and China Glaze Celtic Sun.  Below are swatches of them all:


China Glaze Peachy Keen is an orange peach color creme polish.  It has a great formula just like the rest of the China Glaze polishes and was very opaque after two coats.  One thing I noticed different was that it looked  more pink-orange on my nails, in this picture it looks sort of yellow-orange.  Regardless it is a beautiful color and I can't wait to use it in some nail art.


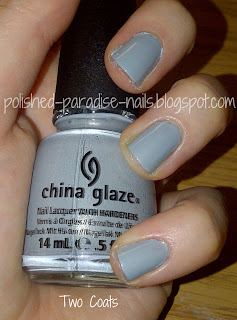
China Glaze Sea Spray is a light gray blue color that I at first glance thought was a creme, but when I looked at it closely it has a slight satin finish, which is really nice.  It was completely opaque after two coats and the formula was nice and smooth.  The color reminds me of a misty beach sky.  I have so many ideas of nail art designs to do with this. I cannot wait to try them out!


Next up is China Glaze Fast Track from the Hunger Games Collection.  It is a light brown almost coffee with milk color with medium sized gold shimmers in it.  It was another two coater! This polish is subtle but it catches the light nicely.  It has a really nice shine to it and I was so happy that I was finally able to get my hands on it.


And last but not least China Glaze Celtic Sun which is a neon yellow color.  It is pretty much the same color as a yellow highlighter.  Neon's are always really hard to get good opacity on so what I usually do put a coat of white polish below them to help them look as bright as they should.  In the pictures above the coat number on the pictures are for the nails that do not have white on them.  The white pinkie nail has two coats over the white in the final picture and as you can see it looks much brighter than the nails that have three coats of polish on them.  This is such an awesome neon color and I am currently using in a water marble!

What do you guys think of these colors?  Do you have any guesses as to what my 500 fan giveaway polishes are?  Leave a comment here, on Facebook, or tweet me @Polish_Paradise.